|
|
Boat
Trailer Winch
Operating
Instructions: Please
read and save these instructions. Read carefully before attempting to assemble,
install, operate or maintain the product described. Protect yourself and others
by observing all safety information. Failure to comply with instructions could
result in personal injury and/or property damaged. Retain instructions for
future reference. DescriptionTrailer
winches are used for launching and loading boats. This winch features
power-in/free-wheel out capabilities. A lanyard cord is supplied for remote
operation. UnpackingWhen
unpacking, inspect carefully for any damage that may have occurred during
transit. Make sure any loose fittings, bolts, etc., are tightened before putting
unit into service. General Safety Information
Danger
means a hazard that will cause death or serious injury if the
warning is ignored.
Warning
means a hazard that could cause death or serious injury if the warning is
ignored
NOTE: Note
means any additional information pertaining to the product or its proper usage.
The following safety precautions must be followed at all times:
1. Read
all manuals included with this product carefully. Be thoroughly familiar with
the controls and the proper use of the equipment. Only persons well acquainted
with these rules of safe operation should be allowed to use the winch.
Always
unplug the wiring harness to prevent accidental starting before attempting to
install, service, relocate or perform any maintenance. 2. Never
use the winch to lift or move people or animals. 3. Stand
away from the winch when in use and keep children away from winch area at all
times.
Always stand clear of the area behind and between the load or anchor point and the winch. Serious injury could occur, if the cable breaks. 4. Always keep hands clear of cable spool (drum area). 5. Do
not wear loose fitting clothing, scarves, or neckties. Loose clothing may become
caught in moving parts and result in serious personal injury. 6. Never use the winch for overhead lifting. 7.
Always wire the winch with circuit breakers. Failure to use the breakers could
cause overheating thus creating a potential fire hazard or motor damage.
The
cable fasteners on this or any winch are not designed to hold rated loads.
Always leave a minimum of five wraps of cable on the drum at the bottom layer to
achieve a rated load. 8. Inspect the entire cable for weak or worn condition or kinking (short tight twist or curl) before each use. 9. When replacing the cable, always use a Powerwinch cable with the same winch rating and cable strength. 10. Never substitute rope for cable. Possible injury could occur. 11. Do
not attempt to pull a load greater than the rated load of the winch. 12.
Do not use the winch to hold or support the load once a job is complete or to
permanently secure the load. Damage could occur to the winch or the load. 13.
Never wrap the winch cable around the load. Use an Ecostrap TM
or chain to prevent the cable from kinking or fraying. 14. Always wear leather gloves when handling the cable. Steel cable can cause hand injuries.
After
using the winch, always disconnect the power cord from the socket to avoid
moisture collection in the socket and prevent the possibility of
short-circuiting. 15.
Always block the vehicle wheels to help prevent the vehicle from rolling when
pulling a load with the winch. 16. Do
not operate the winch under the influence of drugs, alcohol, or other
medication.
Secure
the boat to the trailer after winching the boat onto the trailer or personal
injury could occur. SpecificationsVarious load conditions will affect the winch performance. The line pull required for a specific application depends on the weight of the load, condition of the trailer rollers, and the degree of the loading ramp incline. INSTALLATION WIRING 1.
Locate a suitable place to install your winch (see Mounting Instructions). 3. Run the wires under or through vehicle to the battery. If you need to drill holes to feed the wires, be sure the wires are protected by rubber grommets (not supplied) see figure 1. Be sure wires are not handing down and are clear of moving parts or hot area.
4. Use electrical tape or nylon ties (not supplied) to secure the wires to the frame of the vehicle about every 12". 5.
Attach the black wire to the metal frame. (Sandpaper both sides of the metal
frame where you are attaching the wire) Attach the wire firmly to the frame
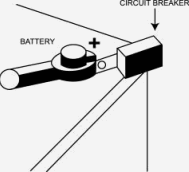
using a 5/16" bolt, nut and lock-washer as shown in figure 2. 6. Attach the red wire firmly to the circuit breaker (where marked AUX). Attach the buss bar (copper plate) to the other end of the circuit breaker (where marked BAT.) See figure 3. 7. Connect the circuit breaker to the battery as shown in figure 4. 8. Check all wires are sure secured and wired correctly.
FIGURE 3
FIGURE 4 MOUNTING Mounting
on vehicle with a trailer hitch: 1.
Install the Plate Stud onto the Adapter Plate as shown in figure 5. 2.
Attach the Adapter Plate to the winch, use a 3/8" screw (not supplied) to
secure the Adapter Plate to the winch. 3. When ready to use, hang the winch on the trailer hitch.
FIGURE 5
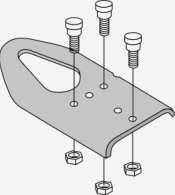
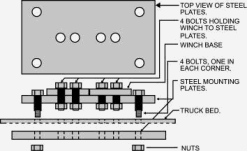
FIGURE 6 TRUCK BED MOUNT NOTE:
Most truck beds are not designed to support the pulling capacity of your winch;
it should be reinforced with steel plates capable of withstanding the rated
capacity of your winch. 1. Use two steel plates and drill eight 3/8" holes on each plate as shown in figure 6. 2. Use 3/8" screws and nuts to fasten the plates and winch. HAY BALER MOUNT Follow the instructions included with your hay baler. In case you do not have the instructions, make sure your winch is bolted to a location able to support the winch under full load conditions. |
|